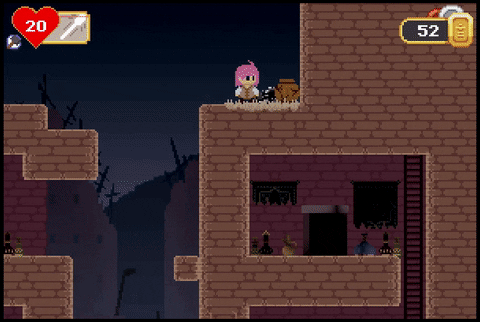
This is a neat little application of a glitch in the game known (to me) as Pot Head Clipping, which I have described in detail in Thought Dump Thursday 3/3/16.
The procedure is simple:
Start new game
Exit Gale’s house
Enter leftmost building
Set up pots as follows
Jump
???
Profit (literally, there’s a chest with 25 Rai in there )
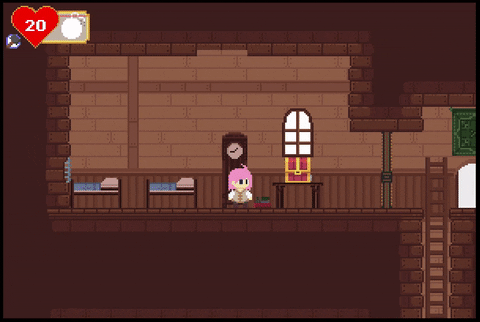
If you manage to get behind the anchor boxes without the Wooden Bat, there’s no way out. Regardless which anchor box(es) you hit with the chest, the box(es) will not move far enough and will not take enough damage to break. Also, because they are anchor boxes, they cannot be pushed like other boxes can.
For the record, my definition of “softlocking” in this game is forcing yourself into a situation that you can only escape by reloading the page. Keeping this definition in mind, the methodology presented above is the fastest way to truly softlock the game, and one of only two. The alternative method is to roll into a small dead-end passageway that ends up blocked off by some sort of container, an example of which is demonstrated in the GIF below.
On the other hand, there are many more ways you can pseudo-softlock; i.e., force yourself into a situation that can only be escaped by reloading the page or dying. In fact, if you remember this image:
This is one such example. Notice that the only way out of the situation is to reload the page or use the Bombs to gradually reduce your HP to 0.
Some other examples of pseudo-softlocking that I can name off the top of my head are: Pot Head Clipping between the two locked doors in Bandits’ Lair; Door Pushing the aforementioned two locked doors (or unlocking one and Pot Head Clipping past the other) and entering the boss door (which resets the doors’ positions and leaves you with no way back but reloading or suiciding); and initiating the Big Eye fight from outside of the barricades (which leaves you in a cut-off place where you can only stand on the right or fall to the left). Speaking of the last case, if you initiate the Big Eye fight from afar and pass through the doorway on just the right frame, you’ll end up on the far right side of the save statue room with an invisible barrier just to the right of the aforementioned doorway. (In this situation, there’s not even anywhere to fall.)
That’s all for today. I really didn’t have anything special to talk about, so I felt like dropping a little Softlocking 101.
From now on, this shall be the title when I have no particular topic in mind but still wish to meet the deadline for Thought Dump Thursday head-on.
Fire Emblem Fates: Birthright
I recently started a new playthrough on Normal Casual and am currently on Chapter 22 after having spent about 27 hours on it. I decided to play as a female, with Clever Boon (+Mag) and Clumsy Bane (-Skill), and marry Ryoma. I also tried some new things in regards to the relationships and most of the classes:
Hana (Lv.1 Swordmaster) + Azama (Lv.2 Great Master)
Sakura (Lv.1 Priestess) + Hinata (Lv.2 Master of Arms)
Mozu (Lv.1 Merchant) + Saizo (Lv.2 Mechanist)
I married Rinkah with Kaze as well, but I didn’t realize that you could keep Kaze after Chapter 15. I had no idea that the secret was having him reach A-rank with the main unit (until I looked it up on a wiki). It’s a shame because, in my first playthrough, I had him at B-rank before the chapter in question.
I don’t plan on doing any child paralogues until both advanced-class parents are at least level 5. I might do Kiragi’s paralogue, though, considering Tomebreaker is subjectively the best thing that Felicia can pass down, and Takumi can’t pass anything Ballistician-related (because it’s a DLC class).
Speaking of which, another thing that I did differently as opposed to my previous playthrough is waiting until base class units hit level 20 in their base class before promoting them with a Master Seal. This change came about because I realized how different the Seal system in Fates is from the one in Awakening, notably in that using Master Seal immediately is no longer the answer (because nothing in Fates works quite like the Second Seal in Awakening; any levels you skip with the Master Seal in Fates will pass by irrevocably).
I don’t know if I’ll ever get any of the other stories (Conquest + Revelations), but if I do, I’ll probably get both. (By the way, Beruka is best Nohrian girl.)
Phoenotopia
Yeah, I’m still working on this as a speedgame. I’m pretty much done with any%, but I do plan on improving my 100% time in the near future, with a bit of new tech that I figured out over the course of my rehearsal runs. I might move on to miscellaneous categories as well, but part of me wants to step away from that territory and instead work on running something different: Diamond Hollow II. (I mean, I kinda said to the sole moderator of the speedrun.com leaderboard of the game that I would consider it.)
I also plan on working on a glitch/skip showcase, which will be a video tutorial with as in-depth explanations as I can possibly provide—on Loot Duping, Ancient’s Crater lockout battle skips, Pot Head Clipping, and more. I plan on improving my 100% time first, though.
On a final note, I compiled a document of save passwords for learning/practicing any% and 100% runs.
This can be found under the Resources section of http://www.speedrun.com/phoenotopia, and the most up-to-date routes and guides can be found under the Guides section.
The last time Conceptis introduced a new logic puzzle was late February 2015, when they introduced Cross-a-Pix (which has become one of my favorites, if not my absolute favorite). Now, in 2016, yet another new form of puzzle is introduced: Block-a-Pix. Unfortunately, due to…well, everything that’s happened since the beginning of freaking May, I couldn’t put together a blog post as close to this release date as I could with that of Cross-a-Pix; instead, I had to do so more than a month after the introduction of the new puzzle format (which was early May). Still, better late than never.
Block-a-Pix, at a glance, seems a lot like Link-a-Pix. Comes in B/W or color, numbers littered all over the board… The difference, however, lies in what happens to those numbers as the puzzle progresses towards its solution. Instead of having to connect two numbers with a link that covers a certain number of squares, the number is surrounded by a rectangular formation with an area equivalent to the number. Also, unlike Link-a-Pix, you shouldn’t have any blank squares whatsoever once the puzzle is completed.
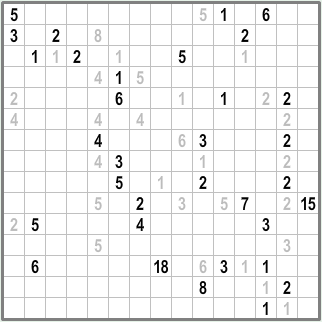
Let’s look at an example:
First off, these sorts of puzzles normally have “dead giveaway” clues, and Block-a-Pix is no exception. What I mean is that we can go ahead and fill in all the 1s, because doing so would create a 1-square formation around the 1, just as the rules dictate.
Now, here’s an important point to consider: if a number is prime (i.e., can only be divided evenly by itself and 1), then it must be surrounded by a Nx1 or 1xN rectangle, where N is the number in question. For instance, the 5 in the top-right corner must be surrounded by a 5×1 or 1×5 rectangle. (For non-prime numbers, however, you have to consider the possible factors; e.g., hypothetically speaking, a rectangular region surrounding the number 24 could be 24×1, 12×2, 8×3, 6×4, 4×6, 3×8, 2×12, or 1×24.)
Something else to consider: when surrounding a number by a rectangular region, the other numbers become obstacles. For instance, a rectangular region surrounding the 15 on the far right cannot extend beyond the 15th column because of the 2s to the immediate left of the 15. Additionally, the 3 in the top-left corner can only be surrounded by a rectangular region extended downward, because the 2 to its right is too close to the 3.
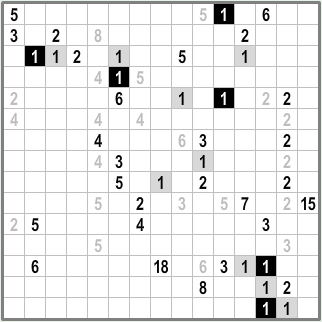
Keeping this sort of dead-end logic in mind, you should end up with something like this (or something more complete if you’re like me and like to work ahead):
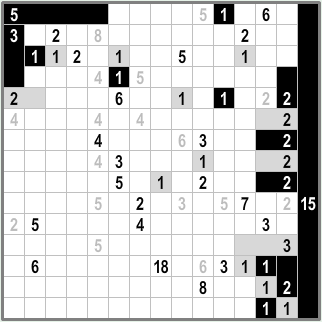
I mentioned before that there should be no blank squares on the board, which brings me to my next point: if there are blank spaces that can only be filled with one particular number, use that number to fill that space. Here are a few examples I can think of:
row 2 column 2 covered by the nearby 2
row 1 column 6 covered by the gray 5 to the right
row 1 column 12 covered by the 2 below
row 3 column 14 covered by the 6 above
row 4 column 2 covered by the gray 4 to the right
row 10 column 13 covered by the gray 2 to the right
rows 14-15 column 12 covered by the 8 to the left
Keeping that in mind, the board should end up looking like this:
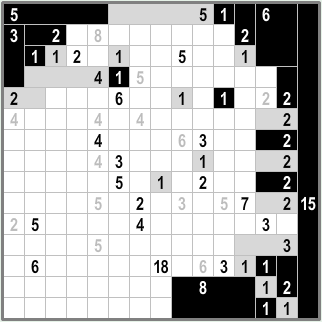
I trust that this explanation will suffice for solving the rest of the puzzle.
That takes care of my explanation of this new puzzle format. It is quite fun, especially more so than Link-a-Pix. I hope this post has been of use somehow, and y’all have fun solving puzzles!
If nothing else, I’ve taken care of the class that I was having trouble with (or at least I think I did; I still haven’t received a grade yet, but I believe I did as well as I could). While I am still job hunting, I certainly feel more free than I did before I went on hiatus.
So, I’ll take a moment to make this post as a (somewhat late) celebration of the second anniversary of my first post on this blog!
Where to start? Phoenotopia, of course! I recently established a new personal best in 100% – 1:48:16 RTA [1h 50m IGT].
I don’t have a detailed route this time, just a set of notes that I use to make sure everything has been accounted for.
As before, note that I will be using timestamps very frequently throughout this writing, and they pertain to the video, not the splits.
First off, I wish to go over the new strats that have been introduced to the route:
Instead of Sunflower Road dupes, dupe in Duri Forest frog room [7:49] and break the eastern Sunflower Road chest normally [13:15] (Door Push to bypass the first key door [6:00])
Move Bandits’ Lair “pit of hell” moonstone to backtrack (was planned to be implemented, but I ended up making a mistake and having to improvise my way out of it [19:46])
Pot Head Clip through barricade for second key (in Bandits’ Lair) [21:05]; use Tumond near the end of Daea prison [42:44]
Swat at the Ghost Wasp swarm on the way to Misty Gorge Heart Ruby instead of standing still and letting them attack [27:53]
In Daea, use Pot Head Clipping to obtain the first moonstone as opposed to the intended way (Remember to let the chest rest on your head before jumping!) [33:57]
Substitute Daea sewer dupe for Cell CIII dupe (20 extra Rai) [38:01]
Move KMG Heart Ruby over to Prince Tower backtrack [1:29:13]
Door Push to obtain the moonstone past the O-door in Dread Lands prior to backtracking (also removes the need to obtain the extra O-key) [51:16]
Pot Head Clip past the second X-door (in Dread Lands) with the moonstone pot on the same screen [53:26] (note that backtracking requires another Pot Head Clip, although not necessarily with the pot [1:36:43])
Move buying the Gold Bar from Atai 3 to Atai 4 (To get to the shop 2F quickly, do a speedy midair throw with the Javelin from the first impermeable roof on the left) [1:18:48]
Extra Honey for Atai well (starting at the barricades (actually revised to a later point [1:10:13]); Pot Head Clip [1:09:41] instead of going for the switches)
Save Lab moonstone in Panselo [1:15:14] for last; use the Pot Head Clipping method [1:14:31] to get the other two
For Sunflower Road west moonstone, find two leaves positioned the same horizontally and hover from the top leaf [1:16:58]
Do Misty Gorge 2 before Adar’s House 2 so that the honey boost from Atai 4 carries over to the Translucent Meat farm (making it faster) (once again, was planned to be implemented, but I decided to change course because I got the Translucent Meat early)
Major rerouting of Forgotten Forest (https://youtu.be/HuJOc5yglcM, but preferably with pressure plate puzzle over Javelin Bomb Jump) [1:37:37]
I will totally admit that the run has its fair share of execution faults (and I’m especially bitter that I failed Arc Skip of all things [1:03:11]), but I don’t think there’s any way that I can improve the route any further. I have to say, though, it’s good to know that Pot Head Clipping and Door Pushing have uses beyond the applications through which I discovered them. Pot Head Clipping in particular has become a lot more useful, especially now that I found out two things about it that I didn’t know before:
You can clip past a key door from the left, even with nothing behind you (but when you clip from the right, there does have to be something behind you)
If the container on your head contains a moonstone or inventory item, performing the clip while the container is stationary will cause Gale to collect the item and jump afterwards.
The following GIFs below (captured using Giphy) demonstrate both of the above points at once.
It’s gone a long way from having more use clipping out of bounds than saving time, to be sure.
Also, when developing the route, I didn’t completely factor in what would happen if you were to obtain Translucent Meat from the Ghost Wasp swarm guarding the Misty Gorge Heart Ruby. It’s easy, though: just do the delivery and Sandwich stuff a bit earlier. It throws the route a bit out of whack, but not to an irreparable extent.
Additionally, while I was rehearsing and fine-tuning the movements required for ideal execution, I found some tricks that will prove to be useful in improving my any% time as well:
Charge-attacking the toads at 3:47
The movement tech at 6:16
Because of the nature of the rubble between Adar’s House and the bomb cave (at 17:33), I now know that it’s better to not use a Jar of Honey until after blowing up that rubble.
Getting more risky with the dog and guard at 37:37
A better way to initiate the “guard gauntlet” (as I call it) at 40:11
Minor optimization for the first floor of Prince Tower (at 43:32)
Picking up the bomb at 50:46 and using it to blow up the rolling bombs at 50:52 (faster than using any inventory item)
The Pot Head Clip to skip the second X-door in Dread Lands (best demonstrated at 1:36:43) is useful for any% as well
Pulling out a bomb (like at 1:02:44) in order to make it easier to break the set of crates containing the one E-Soda in the route
Using bombs like the one placed at 1:44:08 to disable the smaller eyes of Big Eye without having to shine the Artifact on them (as I witnessed in a rehearsal run, this could lead to defeating Big Eye before it gets to its second phase of ropes and spheres)
Keeping these tips in mind, I was doing a bit of practice on any%, and I vividly recall that I ended up with 55m in-game time. The question remains whether sub-53 RTA is possible, however. That said, I feel like it is possible, but at the same time, I have this lingering suspicion that it will take a while to grind.
The most important fact about Phoenotopia that I have to share, however, is as follows: Loot Duping is not pixel-perfect; it has a three-pixel window. As such, I apologize for all the posts and runs in which I assumed otherwise. On the bright side, this fact makes it so that I don’t have to waste as much time Loot Duping on average. In light of recently discovering this fact, I created a new document based on what loot containers can and cannot be duped (which is like the Loot Dupe Positioning document that I had formerly compiled, but more detailed and with a few more loot containers that I missed):
Second, here’s a rundown of my progress through Fire Emblem Fates (Birthright). I’ve made it to Chapter 27, with only one unit lost but several resets along with that. I tried to make it with as few resets as possible, but most, if not all, of the resets were on the grounds of being fatally unprepared.
One particular example I can think of is in Mitama’s paralogue. The thing is, when I play Fire Emblem, I usually play on the defensive, taking into consideration the potential damage outputs of all enemies and using that insight to take an action that would make all my units statistically incapable of dying (if possible). However, this sort of mentality meant that protecting the building in the middle of the area was something that never crossed my mind, and that led me to realize a vital fact that I learned the hard way: if an Adventurer reaches that building, it’s instantly destroyed. When this happened on my first run-through, I could not accept the fate of never meeting Azama’s child, so I saw fit to reset. On the second run-through, though, I went on the offensive (as much as I could, anyway), making sure that Azama (and Rinkah) made it to the building as soon as possible, and it worked out much better.
Another such example is in Chapter 23, wherein I carelessly sent Caeldori and Kiragi as far up from the far right as I possibly could, thinking it would be completely fine. However, I learned the hard way that Camilla had access to a trio of Dragon Veins right beside her, a vital fact that I didn’t notice before I ended turn 1. The veins in question trigger heat waves that deal exactly 10 damage to allied units—and destroy obstacles—in the path thereof, and the fact of the heat waves destroying obstacles was what led my unfortunate pair to winding up in fatal danger. I felt that I could not accept this fate because I had no prior knowledge of those Dragon Veins whatsoever, even though I could have (although I probably wouldn’t have guessed that the Dragon Vein had the side effect of destroying obstacles), hence the reset. Also, the fact that those Dragon Veins can be used infinitely makes the situation all the more frustrating.
Anyway, regarding the loss that I actually accepted, it was the unfortunate and irreplaceable death of Azura, in Asugi’s paralogue. This paralogue in general was a toughie, forcing me to play more aggressively than I would normally deem comfortable. In spite of this, there was a point in the mission where I felt like I could rest easy for a moment…at least, that’s what I thought, until an Adventurer on the left side opened the door closest to the boss, and some Sniper—whom I hadn’t factored in at all—was in range of Azura and straight OHKO’d her. I could have avoided the chance of the OHKO (and maybe avoided the OHKO altogether) if she had been wielding the Dual Nagitana in her inventory, but the enemy had just come out of left field, and it’s normal to want to have a 1-2 range weapon (Bolt Nagitana) equipped by default when it comes to emergency situations like that. Plus, I just didn’t want to reset on that one because I couldn’t be bothered to do the whole mission again from scratch.
To end off this section, here is an updated unit overview. All pairs are S-rank unless specified otherwise. Also, I decided to remove prize units (and bond units) because I can’t be bothered to list all of them, considering I have the maximum allowable quantity.
Kaden (Lv.6 Nine-Tails) + Hana (Lv.6 Master of Arms)
Silas (Lv.5 Paladin) + Mozu (Lv.5 Merchant)
Felicia (Lv.30 Maid) [married Hinata when he was alive]
Subaki (Lv.7 Kinshi Knight) [married Azura when she was alive]
Kagero (Lv.2 Mechanist) [married Kaze when he was alive]
Mitama (Lv.5 Priestess)
Selkie (Lv.4 Nine-Tails)
Yukimura (Lv.10 Mechanist)
Shura (Lv.10 Adventurer)
Izana (Lv.5 Onmyoji)
Ryoma (Lv.4 Swordmaster)
Jakob (Lv.13 Butler)
Reina (Lv.2 Kinshi Knight)
Scarlet (Lv.1 Wyvern Lord)
Finally, some brief talk about the anime that I’m currently watching this season.
Uchuu Patrol Luluco – The story of a “normal” girl who goes through some wacky adventures involving interplanetary stuff. Think Kill la Kill but with a more Mako-like protagonist and 7-minute episodes.
Gyakuten Saiban: Sono “Shinjitsu”, Igi Ari! – Animated Phoenix Wright. I enjoy it, although I find the art style to be a little unsettling. It seems to follow the games very closely, although I haven’t played past the Steel Samurai case, so everything beyond that case is kind of a fresh experience for me. (Even then, it’s been a while since then, so it was nice to have a refresher as well.)
Gakusen Toshi Asterisk 2nd season – Not much difference from the first season except less ecchi and more seriousness. I guess I’ve warmed up to some of the characters (especially the ones whom I initially disliked or overlooked), Saya is still best girl, and I’ve settled on a true worst girl. I won’t spoil anything further because I plan on doing a full review of this in the near future.
Boku no Hero Academia – Don’t watch an anime called Boku. Just kidding; this anime’s great. It’s about superheroes and stuff, like One Punch Man but with a more fledgeling protagonist. Can confirm that frog girl is best girl. (She needs more screentime, though.)
Re:Zero kara Hajimeru Isekai Seikatsu – Where the protagonist is given a mulligan every time he dies…apparently. I didn’t think much of this anime when I watched the first episode of it, but when I noticed it getting popular, I decided to delve further into it, and now I can understand its popularity…at least to an extent. Incidentally, I didn’t realize until episode 2 or 3 that I had actually read 11 chapters of the manga, although that was so long ago that the only memories that I used to make the connection were based on the thief girl and the bulky dark-skinned man. In short, it’s kind of a slow start, but it gets great.
That’s all for today! Vouiv-review is back on its regular schedule until I say otherwise!
I have an important assignment due tonight, so I’ll try to keep it simple.
First off, I have established a new personal best in any%: 54:02!
It is still improvable, though; I had a sloppy Bandits’ Lair and Daea Prison, as well as a few minor mishaps in some other areas. Sub 53 is what I would consider to be a “holy grail” any% time, and perhaps 55m in-game time is possible as well. That said, I won’t return to this category unless I absolutely feel like it.
Second, I’ve always been contemplating the possibility of a new category besides any% and 100%. If it were to be a main category, the only non-arbitrary thing that I can think of is All Medals. There are 30 different “medals” that you can get throughout the game, and they are all listed on pages 1-2 of the following document (courtesy once again of that one Scribd guide (you know the one) for this information):
Based on the medals required, I feel like the best way to approach it would be to complete an any% run first, and then pick up any scraps that you’ve left behind. That said, based on what I think to be optimal, it won’t exactly be an any% run, the primary difference being that you obtain the Heart Rubies dropped by Armored Toad King (the boss of Duri Forest) and the fully grown Sand Dragon (the boss of Bandits’ Lair) in order to minimize backtracking. A notable perk of this is that you get healing between Bandits’ Lair and Misty Gorge, which you don’t get in a regular any% run. (Also, you end up with a maximum of 26 HP, which makes you less likely to die.)
The route also seems to be ridiculously expensive from what I can tell; in a worst-case scenario, I found it to cost 3137 Rai, and that’s including the honey purchases required for any%. To put that into perspective, if you add all possible gains from chests (which factors in Loot Duping; click here for a more details) and various quest rewards posterior to the any% part, I believe it’s a total of 3644 Rai obtainable. It’s a bit worrying to think that only 507 Rai can be spared of these possible gains, although this number can be increased by 90 per High Quality Silk obtained and sold in Daea. Still, there will most likely be a whole lot more Loot Dupes to commit to memory.
At the moment, I still have to figure out the aftermath of the any% part; i.e., where to backtrack and when. I can say a few things for sure, though:
All areas that don’t require extra items (Ancient’s Crater, Dread Lands, Misty Gorge, Adar’s House, Atai Bridge) are to be done first in respective order. Also Atai Bridge before Fran’s Lab so you can free Fran and talk to her to make her move to her lab. (Not 100% confirmed whether this is necessary.)
Duri Forest is to be done before Atai City because Mikan Fruit, which can only be found in Duri Forest, is required for Mikan Fragrance in Atai, which is required for a moonstone and, indirectly, the Lucky Belt.
Atai comes before Sunflower Road because a Wooden Baton from the former is required for a Heart Ruby in the latter.
Atai also comes before Panselo due to that one love letter delivery quest for a Heart Ruby.
Panselo before Cross Roads due to the Chocolate Protein Shake requirement, although it is recommended to head through Panselo another time for a discount of essentially 140 Rai on the shakes required for 99 HP (the first shake free; the second and subsequent shakes 10% off).
Cross Roads should come before Mul Cavern because the Heart Ruby in the latter is a heck of a lot more difficult without the Ki Spear Technique.
Visit Fran’s Lab with 25 moonstones before visiting Daea, if possible. I say “if possible” because it might not even be possible to obtain 25 moonstones before having to go through Daea, Prince Tower, and Forgotten Forest.
Daea comes before the Atai backtrack for the rejection letter delivery because a comic book from Daea is required for a moonstone in Atai.
It is better to access Prince Tower through Daea than to hit the switch during the any% part and access it directly through the world map. This is because there is a lot more to backtrack for in Daea in this category than in 100%.
By the way, beating the game after obtaining all medals is not necessary. And…I guess that’s about it.
In terms of miscellaneous categories, I have a number of ideas (in all of which beating the game is not necessary):
69 HP RTA – This idea has been on my mind since I started routing the game, and I was considering submitting it to Memeathon 3 while submissions were open, but, even to this day, I cannot guarantee that attempting to stream Phoenotopia with my current equipment would go smoothly.
Anyway, the goal is simply to reach a maximum of 69 HP, which is done by obtaining 15 Heart Rubies and consuming 2 Chocolate Protein Shakes. From what I’ve tested, the run is about 30 minutes in duration, and it is therefore the least arbitrary category shorter than any% that I can think of (though it is still arbitrary due to the exact number, and I probably wouldn’t have thought of this sort of category if 69 wasn’t such a notorious number). Click here to view my planning and route.
All Moonstones – Plain and simple: collect all 42 moonstones. I consider this category and the next few listed to be parts of a middle ground between any% and 100%, and this one leans more towards any%. I shudder to imagine just how difficult a category like this would be, considering you would ideally have to spend the entire game under any% conditions (20 HP, no armor, Iron Hammer) and Javelin Bomb Jump your way into Forgotten Forest instead of going the normal way. (The alternative is talking to Fran a bunch of times and receiving an extra 3 HP and an asteroid rock filling up your inventory (although with an extra inventory slot to (sort of) compensate).) On the bright side, not having to collect Heart Rubies or items like in 100% means eliminating annoying crud like the Nebula Armlet, the “pit of hell” (as I call it) in Dread Lands, the love letter delivery quest, and the second tower of Prince Tower.
99 HP RTA – This category leans more towards 100%, and I find it to be rather stupid because obtaining all 23 Heart Rubies (which is part of the goal, along with consuming 5 Chocolate Protein Shakes) requires collecting 40 moonstones, which is all but two. The two that I would skip, incidentally, are the ones that require backtracking through Daea sewer (with the Javelin) and Misty Gorge (with the Rocket Boots (intended) or Javelin (through abusing mechanics)). I’m thinking another name for this category would be Diamond Skin (based on the medal of the same name), although the “99 HP RTA” name is consistent with the nomenclature of the “69 HP RTA” category.
Max HP no Moonstones – Because of how annoying it is that there’s a Heart Ruby that requires 40 moonstones (and also one that requires 5), I decided that the best way to preclude those two would be to simply preclude moonstones. With this, the maximum HP value becomes 93, which is attained by obtaining every Heart Ruby excluding the two from Fran (21 total) and consuming five shakes. Therefore, this category can be seen as a middle ground in itself, between All Moonstones and 99 HP RTA. The good thing about this category over the 100% route is that it eliminates the interior of Ancient’s Crater (basically everything after the Artifact); the entirety of Forgotten Forest and Hidden Village; and backtracking through Misty Gorge and Great Walls. If I do decide to run a miscellaneous category, this will be the most likely candidate.
All Tools – Obtain the Wooden Bat, Slingshot, Artifact, Rolling Technique Scroll, Iron Hammer, Bombs, Hover Boots, Ki Spear Technique Scroll, Morning Star, Lamp, Javelin, and Floatation Donut. This is a category that I just thought of, and…it…actually seems like a good one. I would estimate it to be about the same length as any%, if not slightly longer. Morning Star is undoubtedly the worst part of it, as it requires collecting 25 moonstones along the way, and I would have to route out which 25 moonstones waste the least time compared to the other 17. Still, it seems like a good miscellaneous category. I was considering “All Misc. Items” alongside that, but then there’s the issue of multiple varieties of armor (Leather Vest, Chain Mail, and Ancient Armor), so I just decided to drop that idea.
So, that’s it. If I ever get around to routing and running Max HP no Moonstones, I will also consider improving my 100% time (but not before investigating whether giving Translucent Meat multiple times adds extra to the collection rate when it’s below 100%, which I probably should have tested earlier). I mean, now that I realize that you can move one pixel forward if you drop a container and roll into it (making Loot Duping a whole lot easier), and now that I have an improved route of Forgotten Forest that skips at least two enemies (those two being the Plant Dog and the Arc before the first key door), I may be able to not only get sub 2 in-game time, but probably even surprise myself with a better time.
Just…life. Working on an overdue assignment, having to deal with other assignments on top of that, job searching, keeping up with various 3DS games, chasing a multitude of other breezes…it’s just difficult. The overdue assignment is especially of great concern. All I can say is…as much as there are so many things I want to do, it annoys me that I can’t leisurely choose what to do, when, and for how long without suffering serious negative repercussions one way or another. I just can’t.
I’m not contemplating suicide or anything morbid like that; I’m just saying that things are busy, and writing a blog post is the last thing on my mind right now. So…sorry, but it’s dangerously close to midnight (and I mean it this time), and this is all I have to post.
See anything wrong with this picture?
Yeah, that’s the glitch.
Recently, I was experimenting with movement through Forgotten Forest in 100% speedruns, mostly because my performance in that area in my current 100% record was…less than adequate (in fact, even worse than that of my first 100% run), and I feel like sharing insight on what I consider to be an ideal run of this particular segment rather than trying to find time to improve my 100% time (which is much easier said than done, mostly because I’m in my final semester of college and I would prefer to improve my any% time if anything).
First off, here is a video. It may not be perfect (after all, I am human), but it gives an idea of a Forgotten Forest 100% route that is radically different from the original route.
As you can see, rather than doing everything as intended (except maybe grabbing the fourth key), we skip three out of four required keys in the entire area.
How this route differs from the original route:
I decided to add an extra Jar of Honey to the route (which will be bought as a second jar during the Sunflower Road backtrack), hence the honey consumption at 0:15.
Shortly after the honey consumption, I demonstrate a neat little shortcut that leaves two fewer Arcs (and one less Harpy) to deal with. It relies on the mechanic that the loading zone to the left is actually a wall in which you can embed the Javelin (which you can call Out of Bounds Javelin, or OoBJ, even though that’s pretty much the only practical use for this glitch) and climb up to the second level before you’re supposed to.
Starting at 0:31, I get ready to set up a Pot Head Clip (full info on that glitch in Thought Dump Thursday 3/3/16) that allows me to bypass the first key door at 0:43. Yep, I have now found a practical use for Pot Head Clipping. (Actually, it’s useful in Bandits’ Lair to completely avoid the pit of bandits on the way to key 2.)
With the honey boost, I can do a little hover at 0:50 that bypasses the Plant Dog, and the stamina regen rate makes it much easier to get the first moonstone in the area.
At 1:07, I throw the Javelin at maximum height, use a Bomb Jump to get up onto that Javelin, and do a little Javelin Bomb Jump (JBJ) followed by a Pixel Hover to bypass the second key door (and obtain the second moonstone in the process). If, somehow, the Pixel Hover is not enough, JBJ again. Honestly, this is the worst part of the new route; in fact, my previous take failed it three times (and therefore I felt that I had to re-record and somehow managed to pull it off first try in the re-recording). Still, it’s no more annoying than the pressure plate puzzle that you would have to do otherwise.
As for the “yet another glitch” I mentioned in the title, it is set up at 1:49 and demonstrated at 2:06. Here’s the gist of it: If you push two stacked objects, the top slightly farther forward than the bottom, into a locked door, the door moves with the stacked objects. I randomly found this when I was trying to no avail to find a Pot Head Clip through that locked door, and I call it Door Pushing. That’s right: literally pushing a door. Crazy, right? This allows you to bypass the third key door and obtain the third moonstone.
This technique is sometimes limited, however, as the object on top has a tendency to match its horizontal positioning with the bottom object, which will end up halting the Door Push (in which case you would have to reset the positioning of the objects). Also keep in mind that this is not just limited to duos of containers; you can place a bomb on top of a container to achieve the same effect. I tried this in Bandits’ Lair, hoping I could find a way to skip the two key doors, but when you push one or more doors and leave the screen, the doors’ positions will be reset, meaning even if you were to bypass the two key doors and capture the Bandit Boss, you would be softlocked behind the key doors with no way out.
I plan on testing this in Dread Lands as well, but since it is dangerously close to midnight, I will postpone such testing and edit this post with my findings later on. 4/3/16 EDIT: I’ve tried applying the glitch to Dread Lands, only to come to the conclusion that it’s not worth the trouble. The trouble that I find is, as I mentioned earlier, the technique is sometimes limited. More times than not, I find that the object on top matches its horizontal positioning with the bottom object. I think I’ve had some moments where I could push the door as far as it could go, but I cannot, for the life of me, find any clear meaning behind that effect. If I could, the following applications would be worth it (but, for now, they aren’t):
skipping the O-key door for the moonstone on the second screen to the left
skipping the second X-key door
At 2:19, I finally got it through my head to throw the Javelin while waiting for the bomb to detonate during the Big Robot mark II “skip” to obtain the fourth key. (This key can be skipped, but it would require a boatload of JBJs to bypass the door, which is totally not worth it.)
several other minor optimizations that I haven’t mentioned
Why this run in particular is not perfect (just FYI):
At 0:33, there was a bit of a hovering failure.
bit of an unintentional switch to the Bombs at 1:19
box breaking is hard (1:28-1:40)
Door Push setup was a bit suboptimal (I mean, what was that little idling at 2:03?)
failed Ki Spear throw at 3:09
could have done better against the Arcs later on
sloppy menuing at 3:27
climbed up a few too many branches at 3:34
Even with the few hitches in that particular run, consider the following. Forgotten Forest in my current 100% record took roughly 9 minutes, while in my first 100% run it took roughly 7 minutes. With the new route, I took only four-and-a-half minutes, and that was on my second try.
What am I trying to say? I dunno. It might be some roundabout way of saying “sub 2 IGT is imminent.” But, like I said, I would prefer to improve my any% time if I had time for Phoenotopia runs.
3/19/16 EDIT: I just realized I had “Top Three Thursday” in the title. Ugh…my brain. *fixes*
This is my “business” card. I’m not asking for anything. It’s just…there. (Sorry for the quality; the picture was taken with my smartphone.)
So, I bought this game, Fire Emblem Fates, about a week and a half ago. I chose the path of Hoshido in Birthright (mostly because I dislike Camilla) and, since I already have experience with the series (having played the crap out of Awakening and beaten Radiant Dawn once), I decided to go Hard Classic, as it says on my card. Based on my experience with Awakening, I chose to have increased Speed and lowered Resistance with Dragonstone as my extra weapon. So far, I am up to Chapter 14 with two dead units and one game over.
First was the game over. It happened in Chapter 4, where I activated a dangerous Dragon Vein that caused four Faceless (including the leader) to gang up on me and take all my HP.
Next, Orochi died in Chapter 10 as a Level 7 Diviner. She was paired up with Hayato, and it came to my mind to let a pair of ninjas attack the Diviner pair. Since the combat forecast looked fine when they were paired up, I carelessly thought that it would be okay to move Orochi to the ninjas’ attacking range and separate Hayato from her. However, what I didn’t realize was that Hayato provided an important boost in Speed while they were paired up, and with the loss of that Speed boost, Orochi was attacked twice by the lead ninja (and once by that ninja’s partner as well) and killed.
On a more recent note, I lost Hinata, who was a Level 14 Samurai, in Chapter 13. It was quite a dicey situation where I thought I had to risk either Hinata or Sakura (although I was actually wrong because I overestimated the “danger” that Sakura was in) and thought that there was an alternative that would keep both of them safe. I thought I could heal Hinata and he would be fine. However, I was wrong, as I underestimated the damage output of the General that was threatening him. The entire situation was caused by a critical miscalculation in Dual Guard timing and unit placement. (If Hinata had had just one free space around him, I could have had Azura sing for him and have him finish off that pesky General.)
Still, I am really enjoying my experience so far. One thing I noticed that was a bit disappointing, though, was that they nerfed (or perhaps balanced?) Dragonstones significantly. Notably, they are now magical instead of physical, they no longer have 1-2 range (now only 1), and they cannot perform follow-up attacks. Speaking of follow-up attacks, though, it’s neat how many new weapons and mechanics they added. In particular, “Weak to follow-ups (-x effective Speed)” is something quite out of the ordinary. It’s also cool how some weapons actually grant a damage bonus against weapon types rather than affinity (by which I mean beast, dragon, or flier), namely Axe Splitter, Swordcatcher, and Pike Ruin Club. On that note, it’s also neat how Hoshido and Nohr have different weapons; while Nohr has the traditional swords, lances, axes, bows, tomes, and daggers, Hoshido has more…unconventional weapon types: katana, nagitana, clubs, yumi, scrolls, and shuriken (in respective order). Still on the note of weapons, Mini Bow is a very cool one.
On another note, Fates overthrew the system of Master and Second Seals. Instead, they have Master Seals, Heart Seals, Partner Seals, and Friendship Seals. Master Seals are the same as usual, but the other three Seals mentioned can be used at any level (whereas the former Second Seal was unusable by base classes below level 10) and do not reset the user’s level. Heart Seals change class based on the unit, Partner Seals based on an S-rank relationship, and Friendship Seals based on an A+-rank relationship. (The A+ rank, incidentally, is another new feature of the game. I haven’t tried it for myself, but it’s neat that they have some way to express special bonds between two close friends of the same gender.)
Castles are a great mechanic, sort of like Join Avenue in Pokémon Black 2 and White 2 but better. I don’t want to go into much detail (and I’ll use the excuse that it’s dangerously close to midnight), so I’ll just leave it at that. My castle is named “The Nowi Nest” for reasons that should be obvious.
In terms of characters, the only thing I really have to note is that Oboro reminds me of Umi Sonoda from Love Live because of her dark blue hair and dramatic facial expressions. Also, while I dislike Camilla as a character (and now that I know her better, it’s not just based on her appearance), I will say that it’s intriguing how she is a wyvern rider that wields tomes (i.e., Malig Knight(?)).
To end this off, here is an overview of my units. All pairs are S-rank unless specified otherwise.
Well, looky here. It would seem that I am trapped.
(No, those walls are not destructible or penetrable by normal means.)
Back in Thought Dump Thursday 1/7/16, I mentioned everything about a glitch known as Loot Duping that I found when I first considered speedrunning this game. In more recent news, 1 or 2 days after my latest 100% run (I don’t know which), I discovered yet another glitch. I call it:
Pot Head Clipping
Why the weird name, you may ask? Well…shown below is a video demonstrating how I first performed the glitch.
Near the Prince Tower save statue (before Kobold Mercenary General), I had the wild idea of making a weird arrangement of pots, one of which is placed on my head and at least one other of which is to my immediate left, and managing to clip myself through the barricade guarding the moonstone. It works with any variety of container, but I just call it Pot Head Clipping because (1) it originated with a pot, and (2) it sounds more dank that way.
The way I see it, the game behaves weirdly if you jump with a container placed on your head. Instead of preventing you from jumping or making you jump with the container, it takes Gale and moves her to the nearest available space surrounding her initial position. In this case, as it is evident at around 0:20 of the video, if you were to remove the factor of the pot(s) to your immediate left, the game would simply move Gale to the immediate left of her initial position. However, if you do like in the beginning of the video with the pots to your left, the game will consider the nearest available space to be to the immediate right of the barricade, hence the clip.
Sadly, in terms of speedrunning, I have not as of yet found a practical use for this glitch. In the case presented above, if done right, it does save a little time over doing it the intended way without a stamina boost, but with a stamina boost, the intended way is slightly faster.
However, the glitch does have a number of other cool applications (such as the one shown at the beginning of this post, which was taken in the Heart Ruby area of Daea prison):
Daea Prison – D block
Peek-a-boo! My Javelin and I see you!
Dread Lands – second screen from south entrance
Guess where I am? (Hint: center camera)
Bandits’ Lair / Atai – Nebula Armlet area
Undeniable proof that the left and right rooms are connected.
(This was recorded using Gyazo GIF, hence the poor quality.)
All three of the applications above abuse the fact that you can actually go out of bounds in some areas, which can only be explained as weirdly programmed walls; rather than being given complete impenetrability, only a box width (as I would assume) is made impenetrable, while the rest merely looks like the rest of the wall and is actually just empty space. It’s even weirder in the Daea prison application because some parts of the OoB area aren’t even on the same layer as the others. (By the way, the Dread Lands clip was done using the stationary Rolling Bombs at the far left side of the screen in question.)
So…yeah. Long story short, I found another glitch. While it is fun and has some cool applications, it has little to no practical use. (Here I’m hoping someone will try to prove me wrong.)
Anyway, moving on.
Current speedrun PBs (any% and 100%)
Since I wrote my speedrunning analyses on this game (Thought Dump Thursdays 1/7/16 and 2/4/16), I have been working to improve my times whenever I get the opportunity (which is getting more and more unlikely as I progress through the semester), and I will post my personal best runs on my YouTube channel EchecCritiqueMisc if they beat my record at the time of uploading.
This run had an amazing Dread Lands + Mul Cavern, but the rest of it has “improvable” written all over it. I’m glad I got the “backup” strat for Prince Tower floor 6, though, even if it cost me time. At any rate, I definitely plan on improving this time in the near(?) future, even if it took me quite a grind for this run in the first place. I’m thinking an in-game time of 56 minutes would be a good milestone.
Current 100% record – 1:59:43 (2h 2m IGT)
Much better than my first run, and I actually did manage to cut my record down to sub 2 RTA. (Next is sub 2 IGT if I ever have the patience to grind this category any further.) Honestly, I think the worst part of this run was the Loot Duping. I had so many shaky Loot Dupes in that run alone that it’s not even funny. In other news, got Translucent Meat on the 5th farm (whereas the previous run had perfect RNG with that), the death in Forgotten Forest wasted some time, I could have done the Heart Ruby in Mul Cavern more quickly had I had a better idea what I was doing, and Harpy Skip was second try again. Golem Skip, though… I got that first try, and the setup was almost perfect. Also, there was a massive rerouting between my first run and this one, hence the lack of splits until the end.
It’s hardly, if ever, on the forefront of my mind. Sometimes I’m driving to school. Sometimes I’m in the middle of a lecture. Sometimes I’m working on assignments. Sometimes I’m viewing a Twitch stream. Sometimes I’m playing some freemium 3DS game (usually Pokémon Shuffle). Sometimes I’m trying to get a PB in Phoenotopia. (I’m currently trying for a better time in 100%…still no luck after 7 or so attempts.) Sometimes I’m doing Conceptis puzzles. Sometimes I’m watching anime. Sometimes (although rarely) I’m reading manga. Sometimes I’m reading through the Mondaiji-tachi light novel. (I picked this up recently, and it is a great way to fill the void that the anime left.) Sometimes I’m in the middle of writing Cinq du Soleil. But, when I’m confronted with the thought that Thought Dump Thursday is around the corner, I just sort of…enter a train of thought that goes nowhere fast. My mind drifts from one topic to another, but any topics that I come up with are stupid to write about (whether out of my comfort zone or just plain stupid) or are topics that I wish to put aside until some other special occasion. On that note, that’s what’s keeping me from ever coming up with a debut of Spontaneous Series Saturday: what occasion could I possibly celebrate? Does it even have to be celebrating an occasion? Could it just be something half-hearted like this post is? (It’s real talk, but let’s face it: it’s nothing short of a long-winded rant.) I could talk about how I got a new any% PB in Phoenotopia (54:52) recently, but where would that even fit? I feel like it’d be a waste of space. Should I somehow edit these things into my previous posts? No, because that sort of practice would just throw everything out of whack. Should I make the whole Phoenotopia speedrunning thing a series? That seems like a completely stupid idea. …Maybe? I mean, every Thought Dump Thursday post of this year has somehow involved speedrunning Phoenotopia, be it the center of attention or part of a potpourri. I brought up anime at one point, and I could very well try to do a periodic review of one of the current series (preferably KonoSuba if anything), but I honestly feel burnt out due to the whole “Cavalry vs. Asterisk” series that I did last year. Reviewing is hard, man! Heck, I still don’t even know if I did it right, as I reflect from time to time on what I have written and try to draw a parallel between my writing and what goes on in my head. There’s also the issue of thinking of a last-minute topic and not being able to create a complete post before 11:59 the day of, forcing me to publish an incomplete post marked with the words “UNDER CONSTRUCTION”, complete the post later, and post an update when I’m done. That sort of thing is just a waste of space, and the update post is usually destined to be deleted. I guess in essence what I’m saying is that I do like writing, but thinking of what to write about and how to write about it is a really difficult task that I end up having to face every two weeks, and I always have the choice to either write a half-hearted post or actually take the gloves off and write something that I consider “adequate” or perhaps even better. (The way I am, though, I never consider myself any better than “adequate” in any facet.)
As frequently as I have these moments where I find it hard to think of a topic, I still have plans in mind. This is just a rough list, and there is no guarantee that any of these will become writing in the future.
Why I really like Mondaiji-tachi. The main reason why I’m not feeling up to this is because I would have to read through the entire light novel (which might take a while…seeing how I’m currently on volume 3 chapter 5) and watch the anime a third time (which, sadly, I still haven’t done) in order to really be able to pinpoint why I enjoy this series more than any other (even No Game No Life, a very similar (and way more popular) series).
My journey through anime (in general) from start to finish. This was initially what I had in mind for this post, but of course this sort of thing had to come to mind as late as the last day (not to mention one of two days when I spend roughly 10 hours away from home thanks to my current semester schedule), so I didn’t bother to follow through with it this time. Maybe someday, though…
A retrospective of the characters that I like and dislike. The thing about coming out with a post like this is…I’m sure I’ve said this before, but I have difficulty expressing my opinion.
A final summary review of the winter 2016 anime that I have been watching (Phantom World, KonoSuba, Dagashi Kashi), similar to how I did that sort of thing back in winter/spring 2015. There is a high chance (but, again, no guarantee) that this sort of idea may come into fruition, although, if it does, I might deviate a little from how I did it back then.
Another full post regarding Cinq du Soleil. I don’t plan on doing this until I’ve finished the entire story, which will be quite a long time from now.
Maybe a follow-up to the Cross-a-Pix post (that is apparently the most viewed post on this blog)? The free-to-play puzzles have been extremely difficult as of late, and I was thinking I could provide step-by-step solutions as a sort of Spontaneous Series…wait. That’s actually not a bad idea. Yep, definitely up for consideration. Come to think of it, why just limit myself to Cross-a-Pix? I could also try the same sort of thing for difficult puzzles of other categories, like Slitherlink or Pic-a-Pix. Hey, maybe every two weeks I could pick the one puzzle that I found the most difficult and offer a step-by-step solution thereof.
Anyway, that’s just a long-winded rant regarding how difficult this whole writing thing can actually be and a rough, rough, very rough list of plans for this website. (Most of these plans will be set aside until way later (or potentially even discarded), and there may even be some that I haven’t even mentioned. Stay tuned!


)


 That’s all for today. I really didn’t have anything special to talk about, so I felt like dropping a little Softlocking 101.


You must be logged in to post a comment.